How to use Django migrations
Django is designed to be database agnostic, meaning that it can be layered on top of any supported database. To avoid developers having to deal directly with bare-bones SQL queries, Django uses the concept of Models. Models use built-in Django classes to interact with the database, and Django tracks the structure of those models and monitors them for any changes. When a model is changed, Django insists you create a migration for it. This applies even when creating models for the first time, so in a Django project each app has its own full migration history.
This has a number of benefits: Django will try to ensure that no changes you make to existing models manifestly break existing data; it will warn you about illegal foreign keys or unique constraints that won't work, and of course you should never have to worry about writing SQL to fix bad data. Django keeps a log of all of the migrations you have applied in a django_migrations table, and will keep databases consistent across environments; whether they are client, staging or local databases.
The major drawback is that with multiple developers working on the same models, PRs into the development branch will contain conflicting migrations that need to be resolved. When working to deadlines, this means it can be frustrating for developers as they constantly have to redo their migrations as new PRs are merged.
For further reading on Django migrations, please look at their official docs: https://docs.djangoproject.com/en/3.1/topics/migrations/
Cubed history
At inception in 2012, Django did not natively support migrations. As a result the initial Cubed database creation was not managed by Django, but rather by manually creating and running SQL files. This had the benefits of being entirely customisable and making it impossible to accidentally change a key table, but missed out on the benefits described above. As our processes have matured and we have implemented pipelines and PR reviews, we are moving back to having Django manage our models and table structure. However, making this switch is not without its difficulties, which we will see more of below.
Because we run the same migrations on multiple client databases simultaneously, we have created a custom command migrate_client that has most of the functionality of Django's migrate command, but refactored to work in parallel.
How to migrate your changes
This is of course covered in detail in the Django documentation, but as a quick-stop guide you should:
- Ensure you are working from the latest version of
developmentand have created a branch - In
/srv/attrib-backend/backendon your development box, runsudo python3 manage.py migrate_client --loaddatato ensure that any migrations fromdevelopmentthat you don't already have are applied - Make whatever changes you need to your models
- In the same folder as above, run
sudo python3 manage.py makemigrations. You should see some notation summarising the changes you are making, and once you confirm Django will create a file with all of those changes - Run
sudo python3 manage.py migrate_client --loaddataagain to apply your changes - (Optional) Use HeidiSQL to confirm that the corresponding table now has a different structure
What is --loaddata?
Several of our tables require static data to be inserted for the proper functioning of the project. We achieve this by using fixtures, which are JSON objects that are inserted into the relevant table when migrate_client is run with the --loaddata argument.
    {
        "model": "base.BasePattern",
        "pk": 1,
        "fields": {
            "referer_id": 1,
            "pattern": "{\\s*}",
            "active": 1,
            "created": "2015-11-05T10:50:03+00:00",
            "updated": "2017-06-06T13:05:03+00:00"
        }
    },
The above fixture creates and inserts a BasePattern object with the data provided. Note that we specifically define a primary key - so if you change the data for that object via Django or database manipulation, it will be overridden next time you run your migrations with the --loaddata argument.
Our policy is to use fixtures to insert data wherever we need to create default data, so it is good practice to always run migrate_client with the --loaddata argument.
If there are fixtures to be updated, you will see output from migrate_client similar to the below:
Running loaddata for fixtures default_records.client.json
Installed 17 object(s) from 1 fixture(s)
Running loaddata for fixtures segmentation.client.jsonInstalled 146 object(s) from 1 fixture(s)
Dont run test. fixture: 'test.client.keyword.json
Dont run test. fixture: 'test.client.market-keyword.json
Dealing with conflicts
Occasionally, when you merge development into your working tree, there may be a conflict with the max_migration.txt file. This indicates that the migration history has multiple dependencies for a single node. While resolving the conflict in Git, the max_migration.txt file can have changes from either the local branch or the development branch. However, as a standard practice, let's choose the development branch's changes in the max_migration.txt file. It's crucial to follow all the steps below after resolving the Git conflict. The max_migration.txt file should be committed to the remote branch along with your code when you commit your changes.
You can find more about the max_migration.txt file in the Django Linear Migration Docs. However, this tutorial should be sufficient for resolving the conflict. This file contains the latest changes in the database of the Django app and prevents conflicting migrations from being merged into the development branch. After resolving the Git conflict on the max_migration.txt file, you should proceed with resolving the migration conflict using the process outlined below.
If there is a migration conflict then, on running manage.py migrate_client you will see an error that looks something like this:

This tells us that Django has identified that there are two migrations that are dependent on the same previous migration, and it doesn't know what order to place them in. At the top of any migration file, you will see a list of dependencies that looks similar to this:
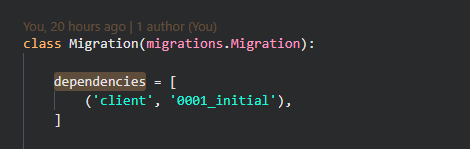
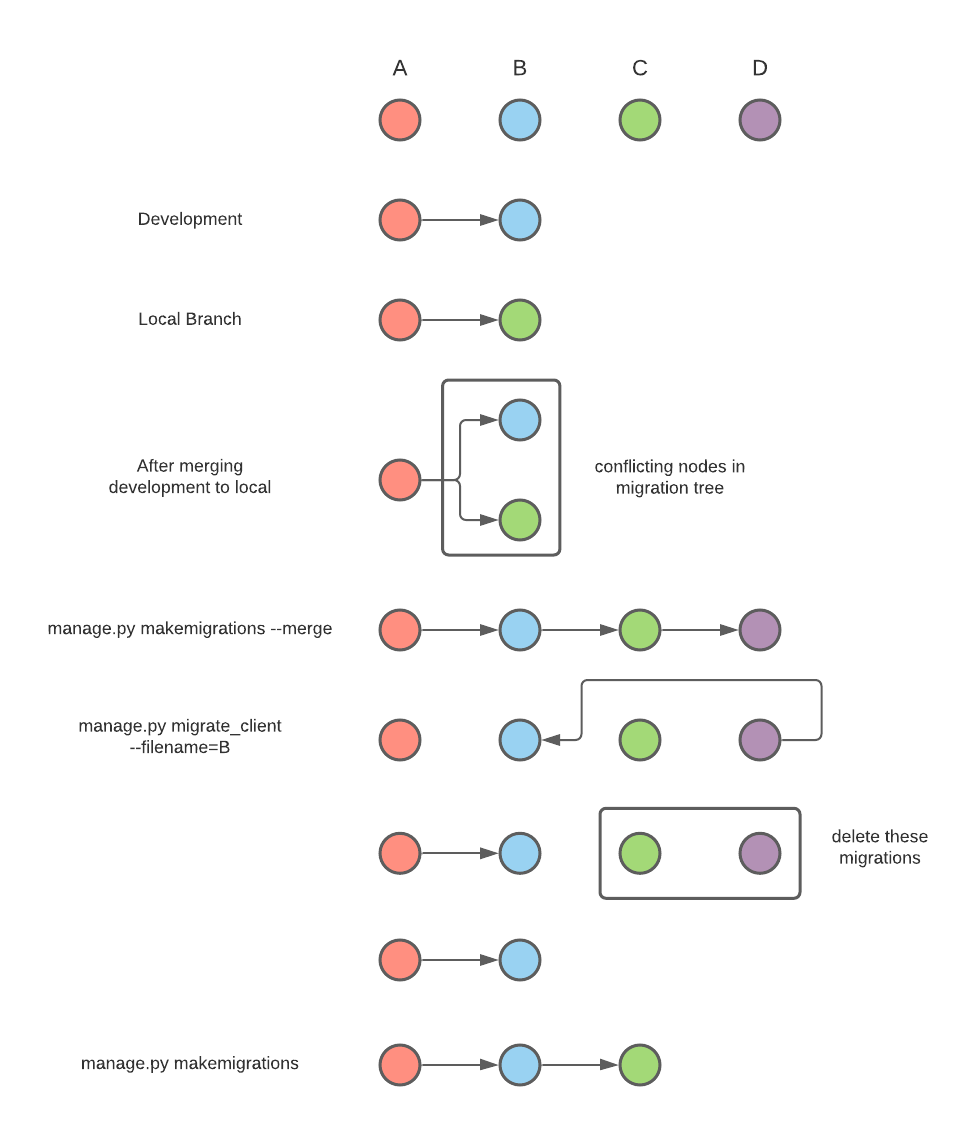
In this case, we know that this migration is dependent on the migration from the client app with the filename 0001_initial. From our example above, both 0002_auto_20200528_0906 and 0002_auto_20200528_0914 rely on 0001_initial, so Django essentially asks us which should go first. This is illustrated by the below diagram.
There are a few options for how we can resolve such a conflict:
Firstly and most appropriately, you should order your migration to follow the one you have just pulled from development. To ape our example above, if we have two migrations A and B in development, and ours is migration C, the correct order should be A, B, C. This means we need to apply the migrations from development first. But, we have already run manage.py migrate locally, so migration C is applied for us but migration B is not - both migrations B and C are reliant on A. This means our database will be inconsistent with client databases which is undesirable, so we need to revert the changes we made in C and create our migration again.
Django gives us the option to roll back migrations to a single point in time via its tree of dependencies, which is what makes it such a powerful tool. The normal syntax for this would be manage.py migrate \[app name\] \[migration number to roll back to\], so something like manage.py migrate client 0001, if we wanted to roll all the way back to our initial migration. Note the space between migrate and client - here migrate is the command and client is the client app within the project.
Because of the Cubed database structure mentioned above, we have to do this slightly differently. The equivalent of the above command would be: manage.py migrate_client --filename='0001_initial. But, if you try to roll back whilst all three migrations A, B and C are present, you will still get the error message above because Django is unsure which path to follow.
To address this using Django as much as possible, we will first create a merge migration that tells Django what order the nodes should be in, then roll back our migrations before reordering them. As you can see from the example above, Django itself suggests that running manage.py migrate --merge will resolve this issue. It will, but with multiple developers working on the same project (and often the same app) we would end up with as many merge migrations as actual migrations, so we do our best to avoid these where possible.
In order to fix the issue, we actually will first run manage.py makemigrations --merge. This creates our merge migration, D. Now, we can use manage.py migrate_client --filename=B to roll back to migration B, the most recent migration from the development branch. Now, our database will match the state it was in after migration B was run; C and D have not been applied. You can check this if you like in your django_migrations table in HeidiSQL.
From here, we delete migrations C and D entirely. This sounds like an extreme step, but as we have made our model changes Django will detect that these exist and insist we remake a migration that reflects our changes. So we will: run manage.py makemigrations once more and a new migration C2 will be created with a dependency on migration B, giving us a linear structure A, B, C for our model history. Note that merge migration D is not recreated; it is no longer necessary.
This helps us keep our migration history lean and precise. By way of summary:
Conflicts
Assuming you have run your migration locally using manage.py migrate_client; have merged development into your branch and are now seeing the migration conflict above:
- Run
sudo python3 manage.py makemigrations --merge - Run
sudo python3 manage.py migrate_client --filename='{latest_migration_file_from_development}' - Delete your migration and the merge migration created in step 1
- Run
sudo python3 manage.py makemigrations - Run
sudo python3 manage.py migrate_client
Don't forget to add --loaddata to update fixtures.
Secondly, if it is absolutely necessary, you can keep the migration created by running manage.py makemigrations --merge and commit this to resolve the issue. This is only truly appropriate where the nodes in the migration tree are significantly out of sync and it would be too time-consuming to try and unpick them. In theory, if the above method is followed this should never be necessary except for large projects being worked on by multiple developers.
Thirdly, if your migrations are simple and you know what you are doing you can unpick the changes made to your database manually. For example, say you added a field to ModelA, which in turn adds that column to TableA. Both of these are done by MigrationA. You merge development to your branch and are faced with the migration conflict above. It is possible to use HeidiSQL to delete the new column from TableA, delete the row that corresponds to MigrationA from your django_migrations table, delete your migration, run manage.py migrate_client and then manage.py makemigrations to achieve the same result as the first option above. However, most of the time unpicking the table data will again be too time consuming.
Modifying migration files
The starting point for this is: don't. Django generates these files in a way that makes sense, and they are designed to be a complete record of a database's history across every possible environment. They contain all of the information Django needs to keep a clean migration history, so as soon as they are manually modified we run the risk of this history becoming inconsistent. This can be extremely painful to fix, so unless you are very clear on what you are doing, let Django create migrations for you. This is particularly true of changing dependencies.
There are two exceptions to this: Firstly, you may wish to rename your migration (preserving the numbering) to something more descriptive - ie from 0002_auto_20200528_0914 to 0002_update_product_unique_keys, or similar. This is not required but some developers prefer it.
Secondly is where you have created your own migration file per the directions below - obviously for these files to be meaningful at all you will need to edit them.
Creating your own migration files
Sometimes it will be necessary to create your own migration files. This is normally the case where data needs to be manipulated, usually where we are adding a unique key to a previously non-unique field. To create a blank migration that nevertheless fits into Django's migration tree, you can run manage.py makemigrations client --empty. This will create a file that looks similar to this:
# Generated by Django 3.0.8 on 2021-12-02 15:01

from django.db import migrations


class Migration(migrations.Migration):

    dependencies = [
        ('client', '0132_merge_20211201_0528'),
    ]

    operations = [
    ]
Note that we still have a dependency list, and our operations list (usually populated by our model changes) is empty. Within this file, you can now write a normal django function and call it via the operations list using syntax similar to the below:
migrations.RunPython(yourfunction_forward, yourfunction_reverse),
Note that there are in fact two functions within our RunPython call - a forward function and a reverse function. This is because Django migrations are expected to be able to traverse forwards and backwards up the migration tree as necessary, which is why we are able to rollback migrations to any point on the tree's history as we saw above. With that in mind, when creating a forwards function consider how it can reversed, and what would happen if the migration was run multiple times. Will your data persist? Will it be duplicated? What effect will that have downstream?
For example, say we have a function yourfunction_forward which adds two rows to a table with a unique constraint on event_name and start_date.
def yourfunction_forward(apps, schema_editor):
    Event = apps.get_model('client', 'Event')
    Event.objects.create(name='My Event', start_date='2021-12-01', attendees=100)
    Event.objects.create(name='My Other Event', start_date='2021-12-02', attendees=250)
The first time this is run, it will run successfully - the Event table is empty for now. However, if this function is run a second time, we will encounter an IntegrityError because these events would violate our unique constraint. This makes this migration a one-time use only, effectively breaking Django's ability to traverse up and down the migration tree. Note that Django itself won't catch this until runtime - whilst Django monitors table structure via models, it does not monitor how custom migrations are used.
So, we need to add a reverse migration to this file - Django will insist upon it. The simplest approach to this is to add a 'no-op' function as the reverse function - which Django supports.
migrations.RunPython(yourfunction_forward, migrations.RunPython.noop),
This might be appropriate for your needs - for example if you are de-duplicating data to allow for a new unique constraint there is no need to re-duplicate the data if the migration is run backwards; the data can remain as it is safely. But, using our example above, if we use a no-op alongside forward_func_A, we will encounter issues when trying to run our migration forwards a second time due to the IntegrityError issue.
There are plenty of ways around this, but to continue our example above, we might consider a reverse function yourfunction_reverse that looks like this:
def yourfunction_forward(apps, schema_editor):
    Event = apps.get_model('client', 'Event')
    reversed = Event.objects.filter(name__in=('My Event', 'My Other Event'))
    reversed.delete()
Now, when our migration is run in reverse our data will no longer be there, so we can run this migration forwards and backwards without issue.
Alternatively, you could consider adding a check to your data entry to ensure that data is only added where it does not already exist. You could use Django's built-in update_or_create function for this:
def yourfunction_forward(apps, schema_editor):
    Event = apps.get_model('client', 'Event')
    Event.objects.update_or_create(
        name='My Event', start_date='2021-12-01',
        defaults={'attendees': 100},
    )
    Event.objects.update_or_create(
        name='My Other Event', start_date='2021-12-02',
        defaults={'attendees': 250},
    )
This will check whether an Event matching the parameters given exists, and if so update it with the attendees number, and if not, create a new object with those details.
An important caveat
You might note that rather than import a model directly in the functions above we use the apps.get_model('your_app', 'your_model) syntax instead. This is because at the time migrations are being run our model state may be in flux (as is the nature of migrations), so apps.get_model will get whatever the current version of your model is at the time of execution by building a state from the migration tree. This will protect you from referencing models that might not be in the state you are expecting.
Unmanaged models
Keeping in mind the 'Cubed history' section above, as our initial block of tables was created without using Django migrations, the models associated with the tables are in an unmanaged state. What this means is that whilst Django is aware of the model, is it not keeping track of any changes to it - rather it is trusting that we know what we are doing in terms of modifying the underlying table structure.
If you are making changes to a model; running manage.py makemigrations and you are seeing a no changes detected message from Django, the most likely reason is that the model you are trying to change is unmanaged. In the model metadata you will likely see something like this:
    class Meta(UnManaged):
        db_table = 'my_table_name'
Most of the time this is simple enough to fix (albeit time-consuming), particularly for smaller tables. However, it is worth discussing these changes with one of the senior developers to ensure they are being made correctly - there may be unexpected knock on effects to making this change.
The usual process for making an unmanaged table managed is as follows:
- Delete the reference to
UnManagedfrom the class Meta. - Run
manage.py makemigrationsas above
What you should now see is a simple migration marking the model as managed.
- Make your changes to the model as required
- Run
manage.py makemigrationsagain
You should now see the model changes you are trying to make reflected in a second migration. It is not recommended to try and perform these steps in one migration: firstly you will have to manually alter the migration file which as below is not best practice, and secondly it increases the risk that the migration file will be incorrectly applied when run in other environments.
The next steps are time-consuming and should be undertaken when not under any time pressure (but still before submitting your PR):
vagrant destroyyour virtual machine- Change your
.backend.ymlfile so thenameattribute is different to the one you normally use: egname: devname_attribtoname: devname_attrib2 vagrant up. This will take quite a while!- Ensure that the virtual machine has been created cleanly (ie, there are no
Failedplays in the ansible playbook) - Check that the table you made managed exists in the state you were expecting using HeidiSQL
- Revert the changes to your
.backend.ymlfile - Delete your
devname_attrib2,devname_attrib2_client,devname_attrib2_seoptand any other unneeded databases (or ask someone to do this for you) vagrant destroyandvagrant uponce more- Create your PR as normal
This will reset your working database to be your usual one.
Running migrations in Cubed
After creating your migrations using one of the above methods, you can now run it across all clients you have access to:
sudo python3 manage.py migrate_client
Loading fixtures
To load data into the DB from the fixture json files call migrate_client with loaddata as shown below:
sudo python3 manage.py migrate_client --account_token="client1" --loaddata